Friday 29 June 2018

Alchemy Laboratory Diorama Part 2: Implements

You can find part 1 of this project here, where I describe how I made the box for this diorama.


In between each box segment I was also working on the various implements that would make up the decorated diorama. The first thing I needed were books. I found a video online that explained how to make them. Basically you take evenly cut pieces of paper, apply some glue to the spine, (as an optional step you can also glue something to the spine to help hold everything and as a second layer of glue so pages don't fall out - I used pieces of coffee filter for this), then glue on a piece of folded cardboard for the backing along the spine. I coloured my cardboard various shades of brown using alcohol markers.


I wanted some open books too, so I downloaded a few old alchemy texts I found online, pulled out 40 or so pages, and edited them so they could be printed in black and white. I printed them double sided (rather than accordion folded like most miniature books you find online). The pages didn't always line up perfectly, but they were good enough. I then cut the pages up and glued them together the way I did the other books. I made 3 different books this way. One of the books had handwritten pages, so I pulled some of those out and edited them to make several pages of loose notes that could go around the desk.


I made a miniature inkwell with quills (and yes, I know real quills had the feathers trimmed back almost all the way). I used black nail polish to mimic the ink.


One of the most difficult things I made was an armillary sphere. I used several strips of thin cardboard for the rings, painted them a mixture of brown and bronze, then glued them together. I used a bead in the centre for the earth, glued to a toothpick. For the stand I used a jewelry head pin and some metal bead spacers that I painted with bronze nail polish.

I used shrink tubing to create several test tubes. My husband 3D printed a stand in 4 parts for them. I filled them with a variety of glow in the dark powders and used Glossy Accents dimensional glue to seal them shut.


I bought some aquarium pieces that I thought would make cool experiment bits and bobs. I used shrink tubing to attach them and ink with mod podge to colour them inside and make them look filled.

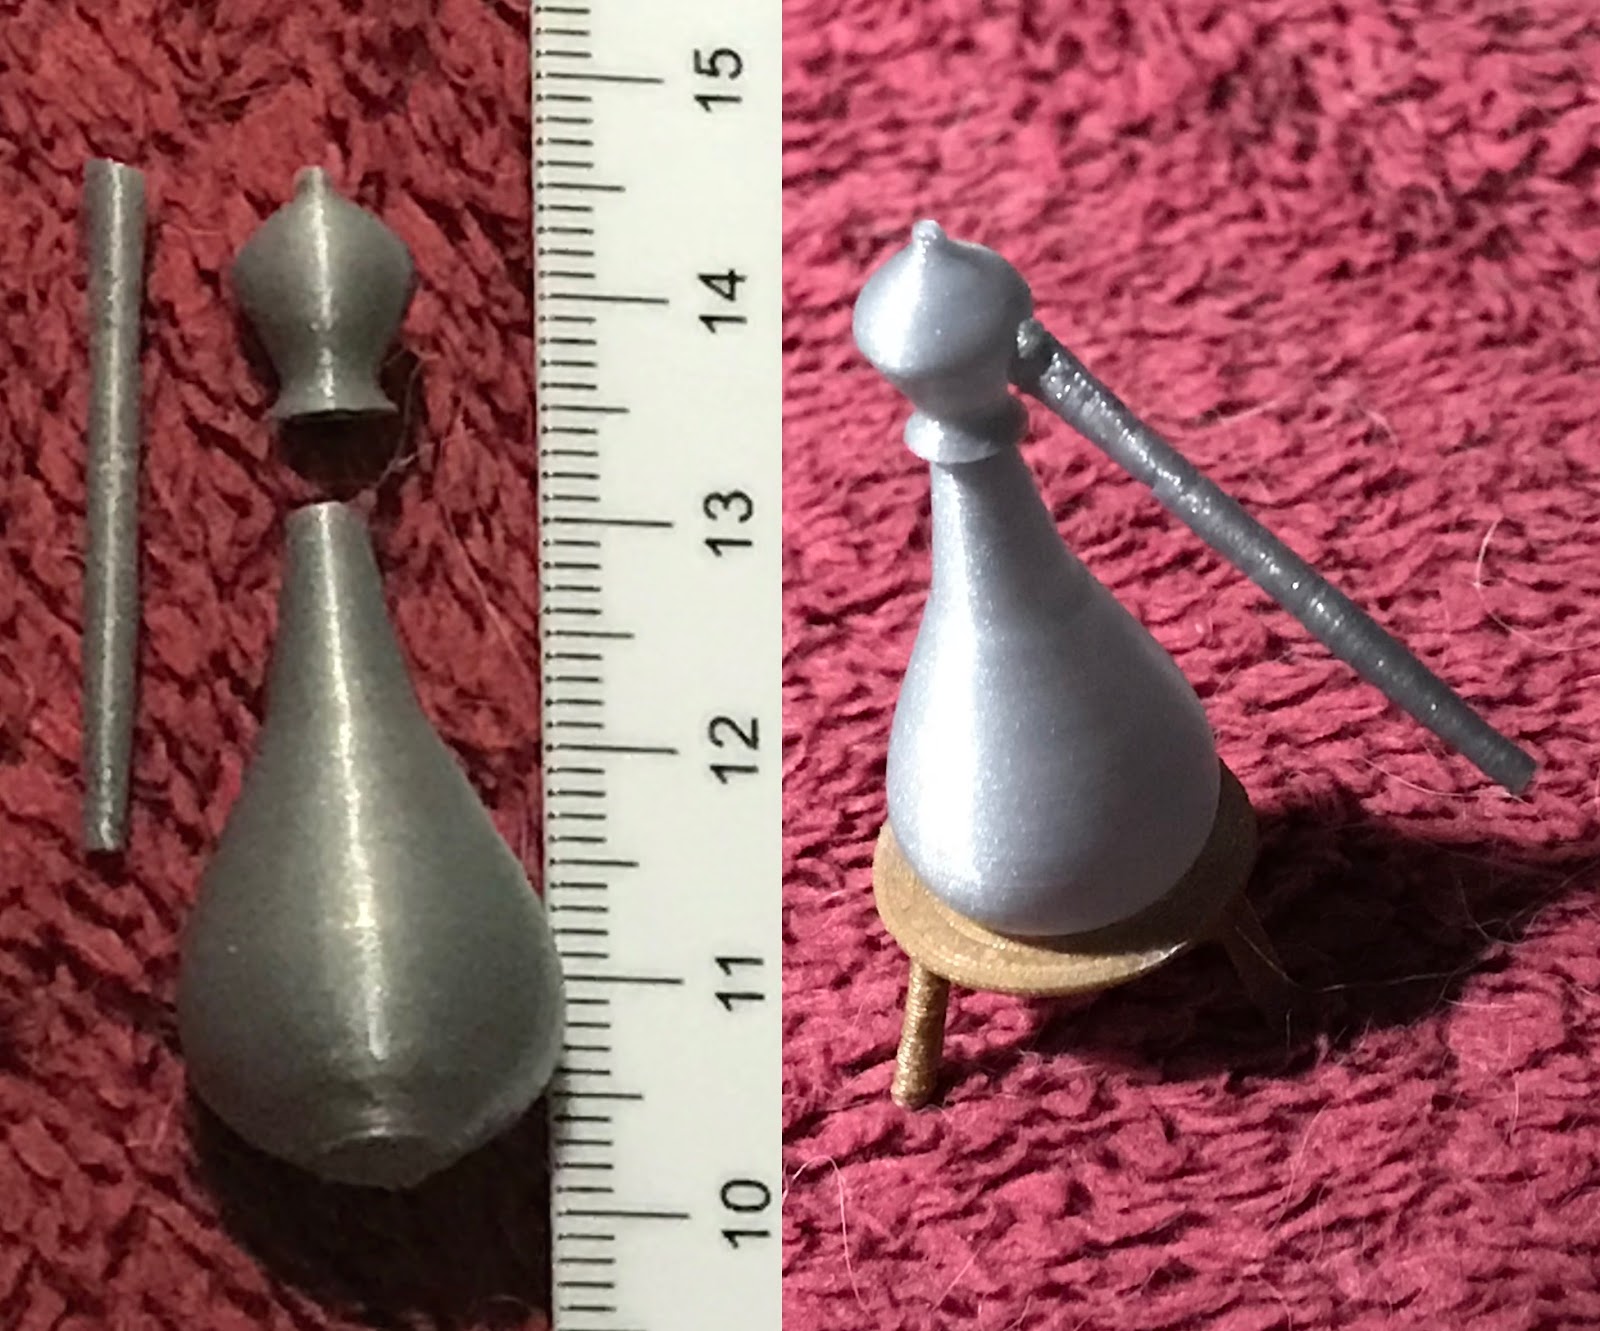
I made a miniature set of billows from 2 wide wooden sticks. I traced the pattern and roughly cut them out, then used a file to get them the correct size. I used a coffee wash on them to stain the wood. I glued down faux leather between the panels - which was easier on one side than the other. The backside looks terrible - luckily only one side shows in the diorama. I hand 3D printed the nozzle but had to thicken it with dimensional embossing liquid. I used the same liquid to create rivets along the edges.

I wanted some fantasy and natural history elements. Among the natural things that made the diorama was this mounted bat. It's a Safari Ltd Good Luck Mini. I made a tiny frame for it and hung it on the left wall. The top shelf of the bookcase houses a mix of natural and not quite natural things. There's a metal mermaid skeleton I found on ebay, several real shells, a piece of artificial amethyst (3D printed in white and coloured with markers), and a unicorn horn (also 3D printed and rubbed with glitter glue and glow in the dark powder). I also made a miniature fairy in a jar. I cut a tiny fairy silhouette out on my Silhouette SD (a cutting machine for paper crafters) and glued it to a piece of wire stuck into a cork. I used 2 more wire pieces to create mini fiddleheads to glue to the bottom of the jar and added some natural dried moss. This sits in front of one of the ultraviolet lights so you can really see the fairy inside.
I bought a bunch of different sized glass vials off of the internet and filled them with a variety of things (often nail art products). One vial is filled with "phosphorus" (actually glow in the dark crystals), which alchemists actually discovered and does indeed glow in the dark.


            Using some nail art gears and a head pin I made a metal flower.

Some other items my husband 3D printed for me include scales (the chain was bought online), a brass mortar and pestle, and an alembic in 3 pieces (+ stand).

One of the first items I did was a mounted butterfly display. Two of the butterflies were made by putting light moulding paste into a butterfly nail art mould. I then coloured them with markers. The third was punched out plastic and also coloured. I made a frame with matchsticks and a piece of cardboard. One of the last things I made was a miniature magnifying glass made from 2 jewelry jump rings, a punched out circle of plastic and a piece of toothpick.

Click here to see the finished diorama! I've also set up an online album where you can see the work in progress with more images of the decorations and how I made them.

Thursday 28 June 2018

Shout-Out: Mage Against the Machine by Shaun Barger

Harry Potter meets The Terminator in this action-packed adventure about a young man who discovers that everything he believed about his world is a lie.
The year is 2120. The humans are dead. The mages have retreated from the world after a madman blew up civilization with weaponized magical technology. Safe within domes that protect them from the nuclear wasteland on the other side, the mages have spent the last century putting their lives back together.
Nikolai is obsessed with artifacts from twentieth-century human life: mage-crafted replica Chuck Taylors on his feet, Schwarzenegger posters on his walls, Beatlemania still alive and well in his head. But he’s also tasked with a higher calling—to maintain the Veils that protect mage-kind from the hazards of the wastes beyond. As a cadet in the Mage King’s army, Nik has finally found what he always wanted—a purpose. But when confronted by one of his former instructors gone rogue, Nik tumbles into a dark secret. The humans weren’t nuked into oblivion—they’re still alive. Not only that, outside the domes a war rages between the last enclaves of free humans and vast machine intelligences.
Outside the dome, unprepared and on the run, Nik finds Jem. Jem is a Runner for the Human Resistance. A ballerina-turned-soldier by the circumstances of war, Jem is more than just a human—her cybernetic enhancement mods make her faster, smarter, and are the only things that give her a fighting chance against the artificial beings bent on humanity’s eradication.
Now Nik faces an impossible decision: side with the mages and let humanity die out? Or stand with Jem and the humans—and risk endangering everything he knows and loves?

Wednesday 27 June 2018

Video: Talking Kitty Cat

I don't know about you, but lately the news has been so depressing I've had to look for more cheerful things to do online, like watching hilarious videos of talking cats by Talking Kitty Cat (aka Steve Cash). I've only seen a few episodes, but they're pretty funny. Here they're introducing a new kitten to the other animals (several cats and a dog). The voice overs for the various animals are great.

Tuesday 26 June 2018

Graphic Novel Review: Lady Mechanika Volume 4: The Clockwork Assassin Written by Joe Benitez and M. M. Chen


Illustrated by Joe Benitez and Martin Montiel

Pros: gorgeous artwork, interesting characters, short mystery

Cons:  

When old co-workers of Archibald Lewis start dying, Lady Mechanika is implicated in their murders.

As with the previous volumes I loved the artwork. I love the sharp cheekbones and narrow chins. I love Lady Mechanika’s Victorian-steampunk outfits. There’s a lot of motion and animation to the frames.

This volume can easily be read independent of the others (there are 2 minor references to prior events). The mystery is fast paced and while there are only a few suspects, it’s neat seeing the team investigate. I was curious why Gwendolyn Cain wasn’t the first person they questioned given her entourage at the funeral and the description of the killer.

This volume collects three issues and tells a complete story that’s entertaining and beautifully rendered.

Friday 22 June 2018

Alchemy Laboratory Diorama Part 1: Making the box

Last year I did a few DIY miniature diorama kits. They came with all the bits and pieces you needed to make a little scene. I enjoyed doing them but wanted to do something bigger of my own design. I wanted to do an alchemy laboratory. I started researching images online (and there are some amazing artists out there). In August I bought the wood for the box frame and got to work.

I worked fairly slowly as I've never done anything like this before and didn't want to make any major mistakes by going to quickly. When it came to the main box a lot of steps had to be done in a certain order.


I don't own a table saw so I had the store where I bought the wood do the major cuts for me ($1/cut). I nailed and glued the boards together and tried to get them as square as possible as they dried. I painted the inside top a mixture of turquoise and blue and then added some bits of glow in the dark flakes and some heat embossed glow in the dark constellations. I added the owl that hangs from the ceiling as I figured it would be harder to put in once the back was on. It was wrapped up so as to not damage itself/the box.

I carved grooves in the other walls for the wires to slot into. I decided to use magnets to hold the glass cover on, so I needed grooves for those to sit. I glued the back panel on (with a cut out door so I could access the electrics) and then painted the interior walls white, except where the corner furnace went, and the floor brown. I then painted the entire outside black and varnished everything.

The next step was adding the wiring for the lights, as the flooring and clay I wanted on the walls were going to cover them. I ran the wires, and added the light fixtures (3D extrusion printed by my husband) and my husband soldered them to the control board. We added a button to change between the different lighting modes he programmed for me. There are 5 candles (2 for each wall sconce and one for the table), a red and yellow light for the furnace, and 3 ultraviolet lights (one above the bookcase, and one for each of the wall shelves).


I used long thin wooden sticks for the flooring, and gave it a coffee stain to make it look more lived in.

The furnace was made out of cardboard, with 2 wooden support beams inside. There's a strip of lantern paper, meant to soften the effect of the red and yellow LEDs that will mimic the fire. I covered the outside with clay and glued it into the box.


I added a black strip of felt to the bottom front for the glass to sit on and glued in the magnets. I finished the back panel, using a magnet to hold it closed. The furnace hides all of the electrics. The USB power cord plugs into the board (which is glued to the opening panel) and comes out the back of the box through a hole that's been covered with felt. The button is glued to the outside.


I used a glass panel from a picture frame and glued metal book protectors to the corners to act as the dust protector on the front.


The next major step was adding clay to the walls. When doing the side walls I smoothed the clay around the wall sconces and then glued those down. For the back wall, I had to mark out where the bookcase and shelves would go and leave space for them. I glued the 3D printed L brackets that would hold the shelves right away so they would be glued into the wall instead of the clay, and not be covered. I added some coffee wash to the clay around the walls (especially above where the candles go).


I added some real ashes around the furnace. I'd made a miniature fire using some twigs and iridescent paper, which I glued in place.


I had already made a bookcase using white masonite and a cardboard backing and then painted.  With the bookcase and shelves glued in, the box itself was finished.


Part 2 shows some of the items I made to decorate the laboratory and part 3 has the finished diorama. I've set up an online photo album with a mostly step-by-step explanation of how I made everything.

Thursday 21 June 2018

Shout-Out: Witchmark by C. L. Polk

In an original world reminiscent of Edwardian England in the shadow of a World War, cabals of noble families use their unique magical gifts to control the fates of nations, while one young man seeks only to live a life of his own.
Magic marked Miles Singer for suffering the day he was born, doomed either to be enslaved to his family's interest or to be committed to a witches' asylum. He went to war to escape his destiny and came home a different man, but he couldn't leave his past behind. The war between Aeland and Laneer leaves men changed, strangers to their friends and family, but even after faking his own death and reinventing himself as a doctor at a cash-strapped veterans' hospital, Miles can't hide what he truly is.
When a fatally poisoned patient exposes Miles' healing gift and his witchmark, he must put his anonymity and freedom at risk to investigate his patient's murder. To find the truth he'll need to rely on the family he despises, and on the kindness of the most gorgeous man he's ever seen.