In between each box segment I was also working on the various implements that would make up the decorated diorama. The first thing I needed were books. I found a video online that explained how to make them. Basically you take evenly cut pieces of paper, apply some glue to the spine, (as an optional step you can also glue something to the spine to help hold everything and as a second layer of glue so pages don't fall out - I used pieces of coffee filter for this), then glue on a piece of folded cardboard for the backing along the spine. I coloured my cardboard various shades of brown using alcohol markers.

I wanted some open books too, so I downloaded a few old alchemy texts I found online, pulled out 40 or so pages, and edited them so they could be printed in black and white. I printed them double sided (rather than accordion folded like most miniature books you find online). The pages didn't always line up perfectly, but they were good enough. I then cut the pages up and glued them together the way I did the other books. I made 3 different books this way. One of the books had handwritten pages, so I pulled some of those out and edited them to make several pages of loose notes that could go around the desk.
 I made a miniature inkwell with quills (and yes, I know real quills had the feathers trimmed back almost all the way). I used black nail polish to mimic the ink.
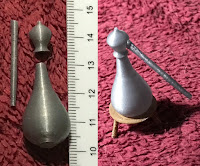
One of the most difficult things I made was an armillary sphere. I used several strips of thin cardboard for the rings, painted them a mixture of brown and bronze, then glued them together. I used a bead in the centre for the earth, glued to a toothpick. For the stand I used a jewelry head pin and some metal bead spacers that I painted with bronze nail polish.
I used shrink tubing to create several test tubes. My husband 3D printed a stand in 4 parts for them. I filled them with a variety of glow in the dark powders and used Glossy Accents dimensional glue to seal them shut.
I bought some aquarium pieces that I thought would make cool experiment bits and bobs. I used shrink tubing to attach them and ink with mod podge to colour them inside and make them look filled.
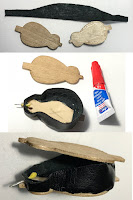
I made a miniature set of billows from 2 wide wooden sticks. I traced the pattern and roughly cut them out, then used a file to get them the correct size. I used a coffee wash on them to stain the wood. I glued down faux leather between the panels - which was easier on one side than the other. The backside looks terrible - luckily only one side shows in the diorama. I hand 3D printed the nozzle but had to thicken it with dimensional embossing liquid. I used the same liquid to create rivets along the edges.
I wanted some fantasy and natural history elements. Among the natural things that made the diorama was this mounted bat. It's a Safari Ltd Good Luck Mini. I made a tiny frame for it and hung it on the left wall. The top shelf of the bookcase houses a mix of natural and not quite natural things. There's a metal mermaid skeleton I found on ebay, several real shells, a piece of artificial amethyst (3D printed in white and coloured with markers), and a unicorn horn (also 3D printed and rubbed with glitter glue and glow in the dark powder). I also made a miniature fairy in a jar. I cut a tiny fairy silhouette out on my Silhouette SD (a cutting machine for paper crafters) and glued it to a piece of wire stuck into a cork. I used 2 more wire pieces to create mini fiddleheads to glue to the bottom of the jar and added some natural dried moss. This sits in front of one of the ultraviolet lights so you can really see the fairy inside.
I bought a bunch of different sized glass vials off of the internet and filled them with a variety of things (often nail art products). One vial is filled with "phosphorus" (actually glow in the dark crystals), which alchemists actually discovered and does indeed glow in the dark.
Using some nail art gears and a head pin I made a metal flower.
One of the first items I did was a mounted butterfly display. Two of the butterflies were made by putting light moulding paste into a butterfly nail art mould. I then coloured them with markers. The third was punched out plastic and also coloured. I made a frame with matchsticks and a piece of cardboard. One of the last things I made was a miniature magnifying glass made from 2 jewelry jump rings, a punched out circle of plastic and a piece of toothpick.
Click here to see the finished diorama! I've also set up an online album where you can see the work in progress with more images of the decorations and how I made them.


No comments:
Post a Comment